
Are you ready to transform your living space into a cozy retreat? This time of year has me craving those warm, inviting vibes that only a beautifully decorated room can provide. Nothing brings a space to life quite like personalized wall decor. If you’re someone who loves to express your unique style through your home, you’re in for a treat. I’ve pulled together 10 DIY room wall decor ideas with a handmade touch that will not only look stunning but also reflect your personality and creativity.
Whether you’re on a budget or just love crafting, these projects are designed for everyone. You don’t need to be a seasoned artist to create something special for your walls. From macramé hangings to gallery walls filled with memories, these ideas cater to different tastes and skill levels. Each piece will add a unique flair to your space, making it feel more like home. Get ready to roll up your sleeves and let your creativity shine!
By the end of this post, you’ll have a treasure trove of budget-friendly decor ideas that can elevate any room. You’ll discover how to make handmade wall art that captures your essence, gives your space a cozy vibe, and impresses guests. Let’s dive into these creative wall decor ideas that promise to make your living space a reflection of you!
Key Takeaways
– Discover 10 unique DIY wall decor ideas that feature a handmade touch, perfect for cozy, bohemian-inspired spaces.
– Learn about budget-friendly decor options that allow you to express your style without breaking the bank.
– Explore various materials and techniques for creating handmade wall art that suits your personal taste.
– Understand how to implement seasonal decor swaps to keep your space refreshed and in tune with changing moods.
– Get tips on designing gallery walls that showcase your favorite memories and add character to your home.
1. Macramé Wall Hangings

Macramé wall hangings are making a stunning comeback, offering a tactile and visually captivating element that effortlessly enhances any bohemian-inspired room. This intricate knotting art infuses your space with warmth and charm, seamlessly blending style and creativity. Imagine the soft texture of cotton cord contrasted against a neutral backdrop, creating an inviting focal point that sparks joy in your home.
To dive into this delightful craft, gather your materials and allow your creativity to flow. You can find affordable cotton cord and wooden dowels at craft stores, and countless online tutorials will guide you through the knotting process, making it easy to personalize your design.
Consider these steps to create your macramé masterpiece:
– Gather materials: cotton cord, wooden dowel, scissors, and optional beads for embellishment.
– Choose a pattern: Start with simple projects like a plant hanger or a small wall piece.
– Experiment with different knots: The square knot and lark’s head knot are great starting points.
– Finish with a fringe or keep it sleek.
– Hang it on a neutral wall to let the texture pop!
This handcrafted decor not only becomes a captivating piece of art but also envelops your space in a sense of comfort and coziness.
2. Woven Basket Gallery

Transform your wall into a dynamic woven basket gallery that beautifully merges natural textures with artistic flair. This decor style introduces a charming mix of shapes and materials, creating an organic vibe that breathes life into your home. Thrift stores and local markets are treasure troves for unique baskets, allowing you to curate an eclectic display that tells your story.
To create your own basket wall, start by selecting various sizes and shapes to ensure visual variety. You can easily arrange and adjust your layout on the floor before hanging to achieve a balanced look.
Follow these steps for a stunning basket wall:
– Select a variety of basket sizes and shapes: Look for round, square, and even oval baskets for added interest.
– Lay them out on the floor first: Experiment with arrangements until you find the perfect balance.
– Use adhesive wall hooks or nails for easy hanging: Ensure they’re secure to hold the weight of the baskets.
– Introduce different textures: Incorporate rattan, seagrass, and bamboo for a rich visual experience.
– Add a focal point: Consider placing a larger statement piece in the center to draw the eye.
This decorative approach not only enhances your wall but also provides a budget-friendly way to express your creativity and style.
Difficulty Rating & Requirements
Overall Difficulty Rating: Medium
This DIY room decor project requires a moderate level of skill and creativity. While some ideas are beginner-friendly, others may challenge your crafting abilities. It’s suitable for individuals with a basic understanding of art and design, as well as those who are willing to learn new techniques along the way.
Time Estimate:
⏱ Estimated time: 4-8 hours, depending on the complexity of the project you choose. Here’s a breakdown of the time for major phases:
– Planning and Design: 1-2 hours – Brainstorm ideas and sketch layouts.
– Gathering Materials: 1 hour – Collect all necessary supplies.
– Execution: 2-5 hours – Create your wall decor items, which can vary in time based on the technique chosen, like macramé or hand-painting.
Skill Requirements:
– Required skills: Basic crafting and painting skills, understanding of design principles, and some familiarity with tools.
– Beginner-friendly: Yes, with explanations provided for each type of decor.
– Skills that can be learned include basic knot-tying for macramé and painting techniques for canvas art. More advanced skills, like stenciling, may require a bit of practice.
Tools & Materials Needed:
🧰 Essential items checklist:
– Scissors (Required) – For cutting materials.
– Hot glue gun and glue sticks (Required) – Essential for assembling decor items.
– Paintbrushes and acrylic paints (Required) – For hand-painted canvas art and signs.
– Macramé cord (Optional) – If you decide to make macramé wall hangings.
– Canvas or wood panels (Required) – These will serve as the base for your paintings or signs.
– Woven baskets (Optional) – For a unique gallery wall.
– Stencils (Optional) – For precise designs on walls or signs.
– Dried flowers (Optional) – For beautiful arrangements.
Step-by-Step Overview:
1. Planning Phase (1-2 hours): Start by deciding which DIY wall decor ideas you want to tackle. Sketch out your ideas and gather inspiration from online sources or magazines. This is also the time to consider color schemes and overall themes for your space.
2. Gathering Materials (1 hour): Make a list of all the materials you need based on your chosen projects. Visit local craft stores or hunt for materials at home.
3. Creating Your Decor (2-5 hours): This phase involves executing your designs. For example, if you’re doing macramé, start learning basic knots. If you’re painting, prepare your canvas and get your paints ready. Take breaks as needed, and don’t rush the creative process!
4. Installation (1 hour): Once your pieces are ready, start arranging and hanging them on the wall. Use a level to ensure everything is straight and visually appealing.
5. Finishing Touches (1 hour): Step back and evaluate your work. Add any final touches, such as arranging other items around the decor or adding lighting for effect.
Cost Comparison:
Professional vs DIY: Hiring a professional to create wall decor can cost anywhere from $200 to $1,000 or more, depending on the complexity of the design and materials used. In contrast, DIY projects can range from $50 to $200, depending on your choices. If you love creativity, crafting your decor can be not only budget-friendly but also immensely satisfying! If you’re looking for professional quality without the time or effort, hiring help might be the way to go.
3. Hand-Painted Canvas Art

Unleash your creativity with hand-painted canvas art that reflects your unique personality! This engaging DIY project allows you to craft one-of-a-kind pieces that transform your space without breaking the bank. With just a few acrylic paints and blank canvases, you can create everything from abstract designs to heartfelt quotes, each piece telling a story that’s distinctly yours.
To get started on your artistic journey, gather your materials and think about your color palette. You can choose tones that match your decor or vibrant hues that make a statement.
Here’s how to bring your artistic vision to life:
– Gather your materials: Buy several blank canvases, a variety of acrylic paints, and brushes.
– Decide on your theme: Consider colors that resonate with your style. You could go for earthy tones or vibrant hues to make a statement.
– Start painting: Layer colors, blend, and experiment with different brush strokes. Embrace the creative process!
– Frame or hang them directly: Use decorative frames for a polished look or canvas clips for a laid-back vibe.
– Group them together: Create a gallery wall with your masterpieces clustered together for maximum impact.
This artistic endeavor not only serves as a therapeutic outlet but also adds a personalized charm that elevates your space.
Hand-Painted Canvas Art
Editor’s Choice


4. Dried Flower Arrangements

Invite the beauty of nature indoors with elegant dried flower arrangements that add a whimsical touch to your walls. This simple yet enchanting decor option allows you to showcase your favorite blooms in a long-lasting way. Imagine the soft hues of lavender and eucalyptus, artfully arranged to evoke a sense of calm and nostalgia.
Creating your own dried flower wall art is a wonderful project that celebrates the beauty of nature. Gather flowers that dry well, like lavender, eucalyptus, and statice, and follow the simple steps to arrange them beautifully.
Here’s how to craft your dried flower masterpiece:
– Gather materials: Fresh flowers, scissors, twine, and a frame or shadow box.
– Dry your flowers: Bundle them and hang upside down in a dark, dry space for about two weeks until fully dried.
– Create arrangements: Once dried, arrange them artistically inside your frame or box. Play with layering for depth.
– Secure the flowers: Use a hot glue gun to attach them firmly and ensure they stay in place.
– Hang it up: Choose a prominent wall to showcase your beautiful floral piece.
Dried flowers not only enhance your decor but also evoke a sense of tranquility and organic beauty in your home.
Dried flower wall art makes rooms feel calmer and truly lived in, with no fuss, just beauty that lasts. When you gather lavender and eucalyptus, you’re turning diy room decor ideas wall decorations into a cozy, everyday retreat.
Dried Flower Arrangements
Editor’s Choice


5. Stenciled Accent Wall

If you crave a dramatic shift in your space with minimal effort, consider crafting a stenciled accent wall! This DIY project invites creativity and personal expression, transforming any room into a stylish retreat. With a simple stencil, you can explore a variety of patterns that resonate with your aesthetic, whether geometric, floral, or abstract.
Starting your stenciling adventure is easy; gather your materials and choose a design that captures your style. Preparing your wall with a fresh coat of paint can also enhance the final result.
Follow these steps to create your stenciled wall:
– Choose your stencil: Find or create a design that speaks to you—think about the vibe you want to bring to your space.
– Gather materials: You’ll need wall paint, a stencil brush, and painter’s tape.
– Prepare your wall: Clean the surface and, if necessary, paint it a base color first.
– Start stenciling: Secure your stencil with painter’s tape, then apply the paint using a stencil brush for crisp edges.
– Remove the stencil carefully: Allow the paint to dry before peeling it off to reveal your masterpiece!
– Add finishing touches: Consider adding a border or additional elements to enhance the design.
This accent wall becomes a bold statement that reflects your artistic side while breathing new life into your room.
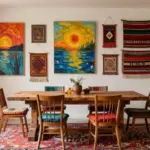
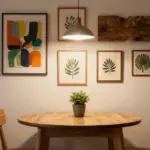
6. Gallery Wall of Memories

Capture your cherished memories and showcase them with a gallery wall filled with personal photos and mementos. This DIY wall decor idea lets you express your creativity while telling your unique story through visuals. Incorporating family photos, travel souvenirs, and meaningful artwork adds depth, character, and warmth to your space.
Creating your gallery wall begins with gathering a mix of items that resonate with you. Before hanging, arrange your selections on the floor to discover a layout that feels just right.
Here’s how to craft your gallery wall:
– Gather your items: Choose a mix of family photos, artwork, and meaningful objects.
– Choose your layout: Before hanging, arrange your items on the floor to find a layout that feels balanced.
– Use various frames: Mix and match frame styles and sizes for a dynamic look.
– Keep it cohesive: Use a color palette to tie everything together, whether it’s warm tones or black and white.
– Get creative with placement: Consider leaning some pieces against the wall for added casual charm.
This gallery wall not only personalizes your space but also becomes a delightful conversation starter, reflecting the moments that matter most in your life.
7. Vintage Plate Wall Art

Showcase your passion for vintage finds with stunning plate wall art! This DIY decor idea adds an eclectic touch that brings personality and charm to your walls. By collecting mismatched plates from thrift stores or family heirlooms, you can create an eye-catching display that serves as a beautiful focal point.
Executing this idea is straightforward; begin by gathering plates with patterns and colors that complement your style. Arranging them on the floor before hanging allows you to find the perfect visual flow.
Follow these steps to create your plate wall art:
– Gather your plates: Look for various patterns and colors that will complement your space.
– Create a layout on the floor: Experiment with different arrangements to find the best visual flow.
– Hang securely: Use plate hangers or adhesive hooks designed for wall decor to ensure they stay in place.
– Consider adding depth: Mix in smaller plates or decorative bowls within the arrangement for visual interest.
– Finish with a touch of greenery: Adding a small plant or decorative item nearby enhances the overall aesthetic.
This creative project not only showcases your unique collection but also serves as a charming conversation starter for your guests.
Vintage Plate Wall Art
Editor’s Choice


8. Fabric Wall Art

Embrace warmth and texture by creating beautiful fabric wall art! This unique DIY project allows you to utilize leftover fabrics, adding a soft touch to your decor. From wall hangings and fabric panels to framed pieces, this approach is both budget-friendly and visually appealing.
Begin by gathering fabrics in various colors and textures, such as cottons, linens, and silks. By experimenting with layering and shapes, you can create dynamic pieces that elevate your space.
Here’s how to get started:
– Collect fabrics: Gather pieces in different textures and colors for visual variety.
– Experiment with layering: Cut the fabrics into different shapes and layer them for a dynamic look.
– Use a frame or stretch over a canvas: For a polished finish, stretch the fabric over a canvas frame or mount it in a shadow box.
– Secure with adhesive or a staple gun: Make sure everything is tightly held down for a clean appearance.
– Hang it up for a soft look: Choose a wall that benefits from warmth and coziness.
Fabric wall art invites touch and adds a tactile element to your decor, enhancing the aesthetic of your room while creating a cozy atmosphere.
Fun fact: swapping fabric panels can upgrade a space with texture in minutes; three layers are enough to make a wall pop. Try cottons, linens, and silks in cozy tones, then rearrange seasonally. It’s a simple, budget-friendly way to nail diy room decor ideas wall decorations.
Fabric Wall Art
Editor’s Choice


9. Painted Wood Signs

Infuse your walls with character by creating painted wood signs that express your favorite quotes or personalized messages. This simple yet impactful DIY project allows for creative expression and adds a personal touch to your space. Using reclaimed wood can give your sign an eco-friendly twist, making it a thoughtful addition to your home.
To start, gather your materials and prepare the wood for painting. Think about the message that resonates with you, whether it’s a motivational quote or a heartfelt reminder.
Here’s how to craft your wood sign:
– Gather materials: Reclaimed wood, paint, stencils or freehand brush, and sealant.
– Prepare the wood: Sand the surface for a smooth finish and remove any splinters.
– Choose your quote: Find a saying that resonates with you, or create your own.
– Paint the design: Use stencils for precision or freehand for a more personal touch.
– Seal it: Apply a sealant to protect your sign from wear.
– Hang it up: Find a prominent spot where your message can be seen and appreciated.
This project adds charm while serving as a daily reminder of what matters most to you.
DIY tip: Your space starts with a single sign—painted wood signs turn plain walls into cozy, lived-in corners. When you personalize the message, your diy room decor ideas wall decorations finally feel like you, not a catalog. Reclaimed wood adds texture and eco-friendly charm.
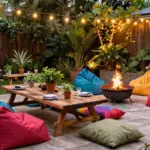
10. Seasonal Decor Swaps

Bring excitement and fresh energy into your home with seasonal decor swaps! This engaging DIY idea allows you to keep your space vibrant and changing throughout the year without the need for a complete overhaul. By rotating your wall decor according to the seasons, you can create an atmosphere that reflects the beauty of nature.
Plan ahead to curate your seasonal themes and keep your decor organized in labeled boxes for easy access. Including both handmade and store-bought items can add variety and charm to your displays.
Here’s how to manage seasonal swaps:
– Store items by season: Keep decor organized in boxes, labeled for easy access.
– Plan ahead: Decide on your themes for each season to guide your decor choices.
– Combine handmade and store-bought items: Balance your DIY projects with a few store-bought seasonal pieces for variety.
– Involve the family: Make it a fun family tradition to swap decor together, instilling a sense of excitement!
– Document your decorations: Take photos of each seasonal display to remember what worked well for you.
Seasonal swaps not only keep your space invigorating but also provide an opportunity for creative exploration throughout the year!
Seasonal Decor Swaps
Editor’s Choice


Conclusion

Embracing DIY room decor ideas not only beautifies your space but also adds a personal touch that store-bought items can’t match.
Each of these projects offers a unique way to express yourself while creating a cozy, bohemian-inspired atmosphere. Get creative and embrace the handmade spirit in your home! Let your walls tell your story through color, texture, and memories.
Note: We aim to provide accurate product links, but some may occasionally expire or become unavailable. If this happens, please search directly on Amazon for the product or a suitable alternative.
This post contains Amazon affiliate links, meaning we may earn a small commission if you purchase through our links, at no extra cost to you.
Frequently Asked Questions
What are some easy handmade wall decor ideas for a bohemian-inspired space?
Here are a few handmade wall art ideas that fit a cozy bohemian vibe:
– Macrame wall hanging using cotton cord for texture
– Fabric tassel garland or woven tapestry to soften a wall
– Framed pressed botanicals or simple watercolor leaves for a natural look
– Mixed-media canvas with embroidery, fabric scraps, and paint for depth
– DIY textile tapestry using crochet or knotting for warmth
Getting started is easy: pick 1–2 ideas, collect affordable supplies (cord, fabric scraps, frames, glue), and choose a color palette that matches your space. Hang one bold handmade wall art piece as the focal point, then layer in smaller handmade wall art and creative wall decor accents. This aligns with diy room decor ideas wall decorations and gives you a unique, cozy vibe.
How can I keep DIY wall decor budget-friendly while still creating unique wall designs?
Plan with a simple palette and 2–3 statement pieces to anchor the room. Here’s how: reuse thrifted frames and repaint them in a cohesive tone; use fabric remnants, yarn, or rope to make inexpensive wall hangings; paint a large DIY canvas or wooden panel with a bold color field or geometric pattern; collect natural elements like dried grasses or pressed botanicals to create handmade wall art at low cost. This approach delivers budget-friendly decor while delivering unique wall designs and personalized home accents.
What materials work best for handmade wall art that looks polished and lasts?
Choose durable, lightweight materials that are easy to mount. Good options include natural fibers (cotton, jute, hemp) for weaving or macrame, wood or cork for frames and panels, canvas or thick art paper with a protective seal, and acrylic paints with a clear top coat. Use reliable adhesives and proper hardware, and seal painted pieces to resist wear. By focusing on handmade wall art and unique wall designs, you get a lasting, high-quality look without sacrificing the handmade touch.
How can I personalize wall decor to reflect my style without clutter?
Start with a mood board to define your style and pick a color palette. Add 2–3 signature pieces that tell your story—think family photos in cohesive frames, hand-lettered quotes, maps from memorable trips, or textile samples from favorite fabrics. Keep balance by pairing busier pieces with calm negative space and using frames with a common finish. This approach boosts personalized home accents while staying cohesive and clutter-free.
What are the best steps to plan and hang a boho-inspired gallery wall with handmade pieces?
Begin by measuring the wall and selecting a focal piece. Create a floor plan or use painter’s tape to layout the arrangement, keeping spacing around 2–4 inches between frames. Mix textures (wood, metal, fabric) for creative wall decor and ensure the wall weight is supported with proper hardware. Hang at eye level and layer pieces to build depth, testing asymmetry or tidy grids until it feels balanced. With careful planning, your wall becomes a cozy, bohemian gallery that showcases your diy room decor ideas wall decorations.