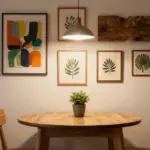
Are you tired of a cluttered kitchen that seems to swallow your sanity? You’re not alone! Many of us crave a kitchen that is not only functional but also visually pleasing. With a little creativity and some budget-friendly materials, you can transform your cooking space into an organized haven. This post was created to inspire you with practical DIY kitchen organization ideas that won’t break the bank.
If you’re someone who loves home decor, enjoys crafting, and wants a tidy cooking area, you’re in the right place. Whether your kitchen is small or spacious, these ideas will help you make the most out of your space while embracing eco-friendly practices. I’ve gathered 12 affordable decor ideas that are clever, charming, and perfect for anyone looking to streamline their kitchen organization. Let’s dive into some fun and creative hacks that will leave your kitchen tidy and utterly delightful!
Key Takeaways
– Discover upcycled materials that can serve as unique storage solutions, helping you save money and reduce waste.
– Learn how to create custom organizers that fit perfectly in your kitchen, ensuring everything has a designated spot.
– Find out budget-friendly hacks for maximizing vertical space, making your small kitchen feel more open and functional.
– Get inspired by simple DIY projects that not only enhance your kitchen but also give it a personal touch.
– Understand the importance of color-coding and labeling, making it easier to access your kitchen essentials quickly.
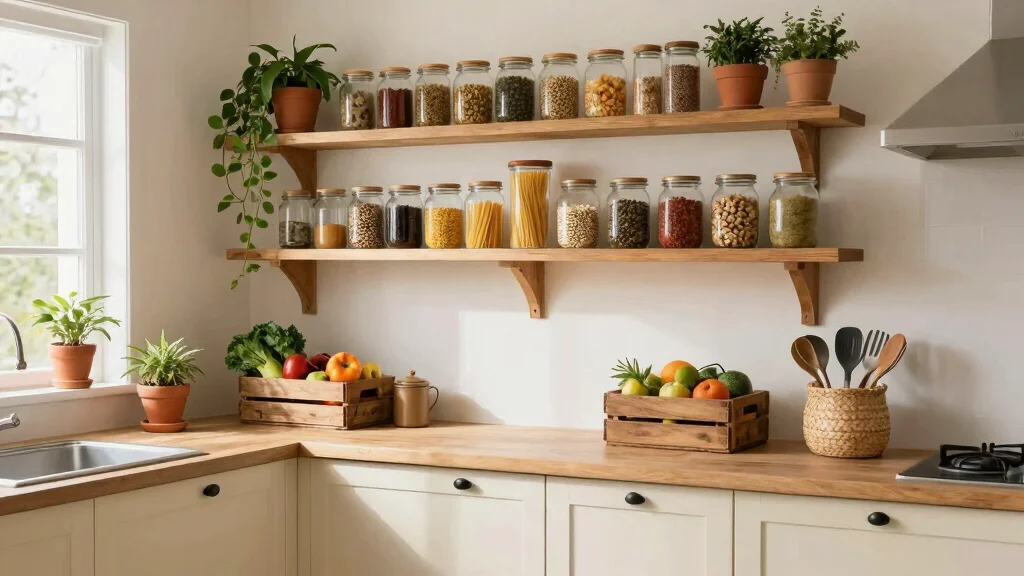
1. Upcycled Glass Jars for Pantry Storage

Embrace the charm of upcycled glass jars in your pantry for a stylish yet functional storage solution. These jars not only keep your ingredients fresh but also add a sophisticated touch to your kitchen. Imagine filling them with colorful grains, legumes, or snacks, all neatly arranged on your pantry shelves. With a simple wash and a personalized label, these jars can transform your cluttered space into an organized haven.To make the most of this storage option, consider mixing various jar sizes for added visual interest. You can often find jars at thrift stores or use any old glass containers you have at home, making this an eco-friendly and budget-friendly choice.Consider these steps to maximize your jar storage:
– Pair different-sized jars for visual diversity.
– Install a tiered shelf to showcase your jars.
– Use twine or chalkboard labels for a rustic touch.
– Fill jars with vibrant snacks to create a colorful display.
This approach not only enhances the aesthetics of your pantry but also encourages you to maintain an organized and efficient kitchen space. The clear glass allows you to see your ingredients at a glance, promoting a sense of order and simplicity.
Fun fact: Upcycled glass jars can cut pantry clutter by 40% in just one week when you label and categorize by size. It’s a simple step in diy kitchen organization ideas that makes meals feel calmer and greener.
2. Spice Drawer Organizer from Reclaimed Wood

Transform old wooden scraps into a beautiful spice drawer organizer that adds rustic charm to your kitchen. This unique project not only keeps your spices easily accessible but also enhances the visual appeal of your cooking space. By creating designated sections for your spice jars, you can quickly locate that elusive seasoning without digging through clutter.For a practical touch, consider using reclaimed wood from old furniture or pallets, making this both a sustainable and cost-effective solution. You can customize the size of each section based on your spice jar collection, ensuring everything fits perfectly.Follow these steps to craft your organizer:
– Measure your drawer to determine the perfect organizer size.
– Cut wood pieces for various jar dimensions.
– Assemble with wood glue for a sturdy finish.
– Sand the edges for a smooth touch.
This organizer not only declutters your drawer but also adds a handmade quality to your kitchen decor. The natural wood tones enhance the overall warmth and character of your cooking area, making it a delightful place to prepare meals.
Spice Drawer Organizer from Reclaimed Wood
Editor’s Choice


3. Magnetic Spice Rack on the Fridge

Elevate your kitchen’s functionality by turning your fridge into a sleek magnetic spice rack. Small metal tins can house your favorite spices, keeping them within easy reach while freeing up shelf space. This clever design not only enhances organization but also brings a modern aesthetic to your cooking environment.To implement this idea, look for magnetic tins that can easily attach to your fridge’s surface. This way, you can create a visually appealing display that showcases your spices while making them easily accessible during meal prep.Here’s how to create your magnetic spice rack:
– Clean the fridge surface for better adhesion.
– Fill each metal tin with your favorite spices.
– Label the tins for quick identification.
– Attach the tins in a pattern that suits your style.
This setup not only declutters your counters but also keeps your spices fresh and visible. The modern touch of magnetic tins adds a contemporary flair to your kitchen, making cooking an enjoyable experience.
4. DIY Rolling Cart for Extra Storage

A DIY rolling cart can revolutionize your small kitchen by providing versatile storage and workspace. Whether you need a mobile coffee station or extra space for your cooking essentials, this project offers both style and functionality. You can easily repurpose an old cart or side table, giving it a new life in your kitchen.Choose a cart that complements your kitchen decor and is easy to move around. Adding storage bins or baskets can help keep smaller items organized and accessible, making your cooking process smoother.Here’s how to create your rolling cart:
– Clean your cart or side table thoroughly before starting.
– Paint or stain to match your decor style.
– Add baskets to organize smaller kitchen tools.
– Position the cart in a convenient spot for easy access.
This rolling cart not only optimizes your storage space but also enhances your kitchen’s overall functionality. With the right materials and designs, you can create a chic and practical addition to your cooking environment.
Cost Breakdown & Budget Planning
Planning your DIY kitchen organization projects can be exciting, but knowing your budget will help you avoid overspending. Let’s break down your potential costs and create a budget that fits your needs.
Cost Breakdown by Category:
– Materials/Products: $10 – $100
Depending on the project, you might need items like jars, wood, or bins. For upcycled materials, costs can be lower if you use what you already have.
– Tools/Equipment: $0 – $50
Basic tools like scissors, a glue gun, or a screwdriver are often already in your home. If you need to buy something, expect to spend up to $50 for simple tools.
– Labor/Professional Installation: $0 – $300
Most DIY projects don’t require professional help, but if you opt for advanced installations, like custom shelving, you may want to budget for labor.
– Optional Extras: $5 – $50
This includes decorative items or additional materials that can elevate your project. Spending a little here can make a big difference in your kitchen’s look.
Budget Tier Breakdown:
Basic Economy Tier $
– What’s included: This tier focuses on the essentials. You might use items like recycled jars or cardboard for dividers. It’s the minimum viable option.
– Good for: Anyone just starting with DIY or needing a quick fix.
– Limitations: You’ll miss out on durability and aesthetic appeal.
Mid-Range Tier $$
– What’s included: A balanced option with key features. You can combine some new materials with upcycled ones, like a mix of new bins and jars.
– Good for: Most households looking for effective organization without breaking the bank.
– Best value for: Those who want a solid look and functionality with moderate spending.
Premium Tier $$$
– What’s included: All features, best quality materials like solid wood or high-end bins. This tier is for those who want a polished look.
– Good for: Homeowners looking to invest in long-term solutions.
– Worth it if: You plan to stay in your home for many years and want a stylish, functional kitchen.
Money-Saving Tips:
– Repurpose Where You Can: Use jars from sauces or containers you already have for storage. This can save you a lot on materials. ✔
– Shop Second-Hand: Thrift stores can have amazing finds for your DIY projects. Look for crates, bins, or even tools! 🚀
– DIY Instead of Buying: Make your drawer dividers out of recycled cardboard or use wooden pallets for shelving. This is not only budget-friendly but eco-friendly! 💡
– Plan Ahead: Sketch your projects and write down what you need. This helps prevent impulse buys that could blow your budget.
Where to Splurge:
– Quality Tools: If you need to buy tools, consider investing in a good set. They can last for years and make DIY projects easier and safer.
– Durable Storage Solutions: Spending a bit more on bins or shelves will pay off in the long run. Quality products will last longer and keep your kitchen organized better.
With a little planning and creativity, you can achieve a beautifully organized kitchen on a budget. Remember to prioritize your needs, stick to your budget, and enjoy the process of making your space work for you!
5. Pegboard Wall for Hanging Utensils

Installing a pegboard wall in your kitchen offers a creative and efficient way to hang utensils, pots, and pans. This solution not only maximizes your wall space but also adds an artistic touch to your cooking area. Consider painting the pegboard in a vibrant color or leaving it natural for a cozy, rustic appeal.Using hooks and shelves on the pegboard, you can customize the arrangement to suit your needs. This setup allows for easy access to your favorite tools, making meal prep a breeze.Here’s how to set up your pegboard:
– Measure the area where you want to install the pegboard.
– Cut it to size and paint if desired.
– Mount it securely to the wall with screws.
– Hang hooks and organize your utensils.
This functional design enhances your kitchen’s organization while turning the wall into a decorative feature. The mix of colors and textures can invigorate your space, making cooking more enjoyable.
6. Drawer Dividers from Recycled Cardboard

Say goodbye to messy drawers by creating custom dividers from recycled cardboard. This simple DIY project keeps your utensils, gadgets, and baking supplies neatly organized while being eco-friendly and budget-conscious. With a little effort, you can transform your drawers into a tidy oasis.Measure your drawer size before cutting the cardboard to ensure it fits perfectly. This customization allows you to create sections that match your specific needs, making organization effortless.Follow these steps to craft your dividers:
– Measure your drawer and decide on the number of sections needed.
– Cut cardboard strips to the required length.
– Secure pieces together with tape or glue.
– Place the dividers in the drawer and organize your items.
This DIY solution not only declutters your space but also offers a sustainable alternative to store-bought organizers. By customizing your layout, you can create a system that works best for you.
Messy drawers? Try DIY dividers from recycled cardboard—it’s a simple, budget-friendly way to nail your diy kitchen organization ideas. Measure your drawer, cut to fit, and create sections that match your needs for a tidy, eco-friendly oasis.
Drawer Dividers from Recycled Cardboard
Editor’s Choice


7. Hanging Herb Garden

Infuse your kitchen with life by creating a hanging herb garden! This delightful project not only beautifies your space but also provides fresh herbs for your culinary creations. Using recycled containers or jars adds a sustainable aspect while saving money on store-bought herbs.Select herbs that you frequently use in your cooking to ensure easy access. This way, you can enjoy the fresh aroma and flavors right at your fingertips.Here’s how to set up your hanging herb garden:
– Fill jars with soil, leaving space at the top.
– Plant your chosen herb seeds or seedlings.
– Attach twine or wire for easy hanging.
– Hang in a sunny spot and care for them regularly.
This greenery not only enhances the beauty of your kitchen but also promotes healthy cooking with fresh ingredients. The vibrant colors of the herbs can brighten any space, making your kitchen feel more inviting.
Hanging Herb Garden
Editor’s Choice


8. Upcycled Wooden Crate Storage

Old wooden crates can be transformed into chic storage solutions that add character to your kitchen. Whether stacked or arranged on their side, these crates can hold everything from cookbooks to fresh produce, offering a rustic charm that elevates your cooking space.Staining or painting the crates allows you to customize them to fit your kitchen’s aesthetic. This inexpensive project gives a new life to materials that might otherwise go to waste.To create your storage solution, follow these steps:
– Clean and sand the crates to remove rough edges.
– Paint or stain to your preference, letting it dry completely.
– Arrange the crates in your kitchen for easy access.
– Use them to display fruits, vegetables, or kitchen tools.
This approach not only helps you organize but also brings warmth and style into your cooking area. The natural textures of the wood can enhance the overall look and feel, making your kitchen a cozy place to gather.
9. Repurposed Ladder for Cookbooks and Utensils

Transform an old wooden ladder into a unique and functional kitchen organizer. Lean it against a wall to create a display for cookbooks, pots, and utensils, adding both storage and style to your space. This creative solution not only saves space but also serves as an eye-catching statement piece in your kitchen.Choose a ladder that complements your kitchen decor for a cohesive look. The steps can hold cookbooks while hooks can hang utensils, maximizing functionality.Here’s how to repurpose your ladder:
– Clean the ladder thoroughly to ensure stability.
– Lean it against a wall securely.
– Use the steps for storing cookbooks or decorative items.
– Add hooks for hanging utensils on the sides.
This project not only keeps your kitchen organized but also adds a personal touch, showcasing your style. The combination of materials can elevate the overall aesthetic, making your kitchen feel more inviting.
Repurposed Ladder for Cookbooks and Utensils
Editor’s Choice


10. Clear Storage Bins Under the Sink

Maximize the often-overlooked space under your sink with clear storage bins. This practical solution is perfect for organizing cleaning supplies, spare trash bags, or kitchen gadgets. With transparent bins, you can easily see what’s inside, eliminating the frustration of digging through clutter.Labeling each bin can enhance your organization even further, ensuring everything has its place. This simple adjustment can make your cleaning routine more efficient.Here’s how to organize under your sink:
– Measure the space under your sink to determine bin sizes.
– Purchase clear bins that fit comfortably.
– Organize your items into these bins for easy access.
– Label the bins for quick identification.
This method not only tidies up a hidden area but also makes it easier to find what you need. The clear bins create a sense of order, making your kitchen more functional.
11. Door-Mounted Storage for Baking Sheets

Utilize the back of your cabinet doors by installing door-mounted storage for baking sheets and cutting boards. This clever solution not only saves valuable shelf space but also keeps your kitchen tools easy to access. It’s a simple yet effective way to organize your kitchen.Using adjustable brackets allows for flexible sizing, accommodating various baking sheet dimensions. This ensures that all your tools are within reach while maintaining a tidy appearance.Follow these steps for installation:
– Measure the back of your cabinet door for the organizer size.
– Purchase a door-mounted organizer that fits your needs.
– Follow the manufacturer’s instructions for installation.
– Load your baking sheets and cutting boards into the organizer.
This setup not only frees up your countertops but also creates a streamlined cooking environment. Keeping your tools organized helps you enjoy a more efficient and pleasant cooking experience.
Did you know door-mounted storage can free up about 30% of cabinet space? For diy kitchen organization ideas, adjustable brackets let you tailor the shelf height to baking sheets and cutting boards, keeping essentials within reach. Quick install, big impact.
Door-Mounted Storage for Baking Sheets
Editor’s Choice


12. Color-Coded Bins for Easy Access

Brighten up your kitchen organization with color-coded bins! Assigning different colors for food categories like snacks, lunch items, or baking supplies not only adds vibrancy but also helps everyone know where things belong. This makes cleanup easier and adds a playful touch to your kitchen space.Involve your family in choosing colors to create a fun and engaging environment. This way, everyone feels a part of the organization process.To implement color-coded bins, follow these steps:
– Choose a color scheme that fits your kitchen.
– Purchase bins in those colors for consistency.
– Assign specific categories for each bin.
– Label them for clarity if desired.
This approach transforms your kitchen into a cheerful and organized space. The visual appeal of color-coding makes it easy to find items quickly while maintaining a lively atmosphere.
Conclusion

Getting your kitchen organized on a budget is not only possible but also a fun DIY adventure! These eco-friendly ideas not only clear your space but also add a unique touch to your home decor. You can mix and match these ideas to create a kitchen that works for you and reflects your personality. So grab those supplies, get creative, and enjoy your beautifully organized kitchen!
Note: We aim to provide accurate product links, but some may occasionally expire or become unavailable. If this happens, please search directly on Amazon for the product or a suitable alternative.
This post contains Amazon affiliate links, meaning we may earn a small commission if you purchase through our links, at no extra cost to you.
Frequently Asked Questions
What Are Some DIY Kitchen Organization Ideas on a Budget?
These DIY Kitchen Organization Ideas on a Budget are practical and eco-friendly.
Start by sorting your pantry, then repurpose clean glass jars for dry goods to reduce waste and improve visibility.
Use a pegboard or magnetic strip for utensils and knives, and mount a slim rack under cabinets for lids and spices.
Label everything to speed up mealtime and avoid duplicates. With budget-friendly materials like recycled jars and bamboo, you can achieve a cohesive look using budget kitchen storage and affordable decor ideas.
How Can I Maximize Small Kitchen Solutions with Budget Kitchen Storage?
In a small kitchen, every inch counts. Start by mapping zones: cooking, prepping, and cleaning.
Install a wall-mounted rail to hang pots, pans, and utensils to free cabinet space.
Use door storage and slim roll-out organizers, and choose stackable containers so you can store more in the same footprint. Pick materials that last and look good, like stainless steel or bamboo, for an eco-friendly touch.
These kitchen organization hacks deliver small kitchen solutions without breaking the bank.
What Are Simple Kitchen Organization Hacks That Use Eco-Friendly Materials?
Go for glass jars, metal canisters, and wooden shelves to cut plastic use and boost sustainability.
Try recycled crates as open shelves, and a pegboard to keep utensils handy.
For food, switch to beeswax wraps or silicone lids instead of plastic wrap. Label containers with a chalkboard label to reuse; these kitchen organization hacks align with eco-friendly ideas and DIY home organization goals.
How Do I Create Affordable Decor Ideas That Also Improve DIY Home Organization?
Turn decor into storage with woven baskets, crate shelves, and stylish canisters.
Paint a small cabinet with chalkboard paint to create a note space and label items for easy access.
Use repurposed wooden crates as vertical shelves for spices or dish towels; this combines affordable decor ideas with practical storage.
Choose neutral tones so items blend in, and keep DIY home organization front and center without sacrificing style.
What Start-To-Finish Steps Can I Follow for DIY Kitchen Organization on a Budget?
Start with a quick audit: pull everything out and purge items you never use.
Then group items into zones (cooking, baking, snacks) and plan where they’ll live.
Choose transparent, reusable containers and measure spaces before buying; repurpose jars and tins you already have.
Install a simple pegboard, pull-out baskets, or under-sink organizers to maximize space, and label everything. Maintain the system with a monthly declutter and rotate items as seasons change; this approach keeps your DIY home organization practical and budget kitchen storage efficient.