Finding the right tool when you need it can feel like searching for a needle in a haystack. With tools scattered everywhere, it’s easy to get overwhelmed and frustrated. That’s why I created this post. I want to help you reclaim your space and make your tools easy to access. Whether you’re a seasoned DIY enthusiast or just starting to dabble in home projects, organizing your toolbox is essential for a smooth workflow and a stress-free environment.
If you care about keeping your tools in order and want to make your workspace more functional, this list is for you. With these ideas, you’ll be able to manage and store your tools efficiently, giving you the freedom to focus on your projects instead of hunting for the right wrench or screwdriver. I’ve gathered 12 practical toolbox organization ideas that are simple to implement and can transform your tool storage into a space where everything has its place.
Get ready to dive into a world of creative and effective DIY tool organization solutions! These ideas will not only beautify your workspace but also save you time and energy. Whether you’re looking to upcycle materials or simply label your tools, you’ll find valuable insights that cater to various needs and styles.
Key Takeaways
– Pegboards are a great way to hang tools and keep them visible, making it easy to grab what you need at a moment’s notice.
– Drawer dividers help organize small tools and accessories, preventing clutter and keeping everything in its rightful spot.
– Magnetic strips can securely hold metal tools, allowing you to clear off surfaces and keep frequently used items within arm’s reach.
– Clear bins enhance visibility, letting you quickly see the contents without rummaging through boxes or drawers.
– Labels are essential for maintaining organization; labeling containers and sections ensures that everything goes back where it belongs after use.
1. Utilize Pegboards for Easy Access

Pegboards are an excellent way to enhance your workspace by optimizing wall space while keeping your tools visible and accessible. This design element creates a personalized organization system tailored to your specific tool collection, allowing for a blend of practicality and style. When you mount a pegboard, you can hang tools directly on the surface, making it easy to see everything at a glance. Consider painting the pegboard a vibrant color that complements your workspace for an extra touch of personality!
To make the most of your pegboard, think about these practical tips: use a variety of hooks and shelves to create a layout that suits your workflow, and ensure your tools are arranged by type or frequency of use. You can find budget-friendly pegboards at local hardware stores or online.
Consider these elements to maximize this palette’s potential:
– Pair pegboards with a color scheme that matches your decor.
– Install different hook types for various tools.
– Use small bins for screws and nails.
– Organize tools by type or frequency of use.
Your pegboard can be both functional and a visual centerpiece, enhancing the overall organization and aesthetic of your workspace.
Pegboards turn chaos into clarity—your tools become a visible, easy-to-access display. Tip: paint the board a vibrant color that complements your workspace, then watch tool box organization ideas come together in minutes.
Utilize Pegboards for Easy Access
Editor’s Choice


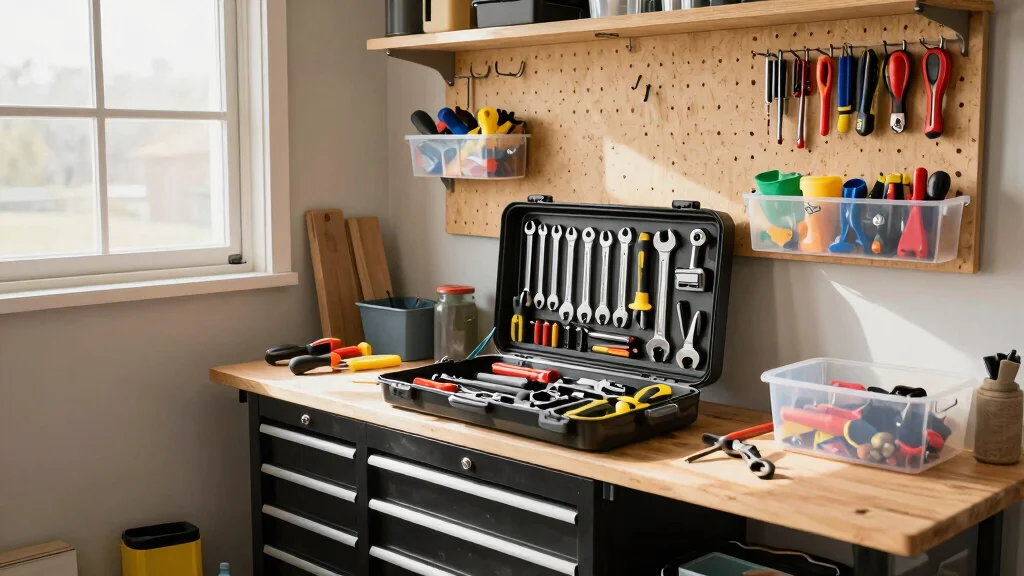
2. Drawer Dividers for Small Tools

If your toolbox is packed with smaller tools, drawer dividers can make all the difference in keeping everything organized. These dividers create dedicated spaces for each tool, significantly reducing the time spent searching for what you need. Imagine effortlessly grabbing a specific screwdriver or measuring tape without the frustration of sifting through clutter! Adjustable dividers can be particularly handy, allowing you to customize compartment sizes to fit your tools perfectly.
To implement drawer dividers effectively, consider using foam inserts to keep tools secure and protected. Labeling compartments is also a great idea for quick identification, and clear dividers can help you see what’s inside at a glance.
Here are some additional insights:
– Use foam inserts for protection and stability.
– Label each compartment for quick access.
– Choose clear dividers for visibility.
– Organize tools by type or project for streamlined efficiency.
Drawer dividers not only simplify your workflow but also make maintaining a clean toolbox a breeze, as each item has its designated space.
3. Use Magnetic Strips for Metal Tools

Magnetic strips provide a straightforward and effective way to organize your metal tools while keeping them visible and easily accessible. These strips can be mounted on walls or the inside of cabinet doors, creating a sleek display. They hold tools securely, eliminating the worry of losing them or having them fall. This method is particularly effective for organizing pliers, scissors, and other small metal items.
To maximize the benefits of magnetic strips, consider installing them at eye level for easy access. Choose strong strips that can support the weight of heavier tools, and group similar items together for a tidy arrangement.
Consider these tips to enhance your setup:
– Install strips at eye level for convenience.
– Select strong strips for heavier tools.
– Group similar tools for a cohesive look.
– Use strips in other areas like the kitchen for versatile storage.
With this simple solution, you can transform a chaotic tool area into a stylish and organized display.
Use Magnetic Strips for Metal Tools
Editor’s Choice


4. Clear Bins for Visibility

Visibility is crucial when organizing your tools, and clear bins offer a practical solution. They allow you to quickly identify contents without opening each container, making it easier to find screws, nails, and other small items. Not only are clear bins functional, but they also give your space a clean and orderly appearance.
To effectively incorporate clear bins into your organization system, sort items by size or type and label each bin for easy identification. Stackable options can save space, and bins with lids help keep dust out.
Here are some ideas to use clear bins effectively:
– Sort items by type and label for quick access.
– Use stackable bins to save space.
– Choose bins with lids for protection against dust.
– Incorporate varying sizes for different tools.
By investing in clear bins, you’ll streamline your tool management and make your DIY projects more enjoyable.
Clear bins boost visibility and save time—you can spot screws, nails, and small parts at a glance. Pro tip for tool box organization ideas: sort by size, label each bin, and stack neatly to keep your workspace calm and efficient.
How To Choose Tool Storage Solutions
Choosing the right tool storage solutions can make a significant difference in keeping your workspace organized. With so many options available, it’s essential to consider your specific needs and preferences. Below are some critical factors to guide you in selecting the perfect storage solution for your tools.
1. Size
The size of your tool storage should fit your collection and available space. Measure the area where you plan to install or place your storage unit. Ensure it can accommodate all your tools without overcrowding. For example, if you have long-handled tools, consider storage with vertical space, like tall cabinets or pegboards.
2. Material
Consider materials like plastic, metal, or wood based on durability and aesthetics. Metal storage options, like steel toolboxes, are sturdy and long-lasting. On the other hand, plastic bins are lightweight and resistant to moisture. If you prefer a rustic look, wooden shelves or cabinets can add charm while providing practical storage.
3. Features
Look for features that enhance usability. Does the storage option have compartments or dividers for small tools? Is there a locking mechanism for security? Some units come with wheels for mobility, making it easy to roll your tools to different areas. Think about what features will make accessing your tools simpler and more efficient.
4. Budget
Your budget will impact your choices. Tool storage solutions come in various price ranges. Determine how much you want to spend before shopping. Consider investing in a higher-quality option if you have a significant tool collection. Remember, cheaper options may wear out more quickly, leading to more spending in the long run.
5. Style
Choose a style that fits your garage or workspace decor. Whether you prefer a modern look or something more traditional, there are options to match your taste. Seamless integration into your existing space will make your area feel cohesive and organized.
6. Accessibility
Think about how easy it is to access your tools. Choose storage that allows you to see and reach your tools quickly. Open shelving can provide instant visibility, while closed cabinets may require you to open doors to find what you need. Aim for a balance between organization and accessibility to keep your workflow smooth.
Pro Tip: Before making a purchase, visualize how you’ll organize your tools within the storage solution. Drawing a simple layout can help you determine if the chosen option will meet your needs. Consider making a list of your tools and measuring their dimensions to get the best fit.
5. Utilize Upcycled Containers

Upcycling old jars and containers into storage solutions for your tools can be both fun and environmentally friendly. This approach not only helps reduce waste but also adds a personal touch to your organization. Repurposing items allows you to store everything from screws to paintbrushes, giving your workspace a unique flair.
To make the most of upcycled containers, consider using glass jars to store screws and nails, allowing easy visibility of their contents. Old cups can hold brushes or small tools, while tiered systems can create visual interest.
Here’s how to creatively use upcycled containers:
– Use glass jars for screws and nails.
– Repurpose mugs for brushes or small tools.
– Create a tiered storage system for variety.
– Label each container for organized access.
This approach not only keeps your tools organized but also breathes new life into items that would otherwise be discarded.
6. Label Everything

Labeling might seem minor, but it significantly improves your toolbox organization. When everything is clearly labeled, you’ll save time searching for tools, allowing you to focus more on your projects. Choose a labeling method that suits you, whether it’s using a label maker, handwritten tape, or decorative chalkboard labels.
To make your labeling system effective, label bins, drawers, and shelves for easy identification of where items belong. Color-coded labels can help categorize tools, and visual cues like images can assist in shared spaces.
Here’s how to enhance your labeling:
– Label all bins and drawers for easy identification.
– Use color-coded labels for tool categories.
– Incorporate images for quick reference.
– Update labels as your organization changes.
A well-structured labeling system will turn your chaotic toolbox into an organized haven.
Label Everything
Editor’s Choice


7. Rolling Carts for Mobility

If you frequently need to move tools around, a rolling cart can be a game-changer. These versatile carts hold various tools and supplies while providing the convenience of mobility. A well-designed rolling cart keeps everything organized and allows you to transport tools to different workspaces easily.
When selecting a rolling cart, opt for one with multiple shelves and drawers to maximize storage. Ensure it has a sturdy build to accommodate heavier tools, and personalize the top surface for quick access to frequently used items.
Here are some tips for choosing a rolling cart:
– Opt for a cart with multiple shelves for organization.
– Choose a sturdy model for heavier tools.
– Use the top for frequently used items.
– Add personal touches with colors or decals.
Rolling carts enhance organization and add a fun element to your workspace while making tool transportation a breeze.
Rolling Carts for Mobility
Editor’s Choice


8. Overhead Storage Solutions

Maximizing vertical space is essential, especially in smaller garages or workshops. Overhead storage solutions keep tools off the ground while remaining easily accessible. Options like shelves and hanging racks help you utilize every inch of available space.
To implement overhead storage effectively, select sturdy shelving that can handle the weight of your tools. Group similar items together for a coherent look, and use clear bins for easy identification.
Consider these tips for overhead storage:
– Choose durable shelves for heavy tools.
– Group similar items for a tidy look.
– Use clear bins on overhead shelves for visibility.
– Label everything for quick access.
With overhead storage, you’ll create a spacious and organized environment, allowing for more room to work on your projects.
9. Outdoor Tool Storage Solutions

If your tools are frequently used outdoors, it’s crucial to choose storage options designed to withstand the elements. Outdoor tool storage solutions protect your equipment from weather damage while keeping everything accessible when you need it.
Think about investing in weatherproof storage boxes or sheds for larger tools. Wall-mounted tool racks can keep tools visible in your outdoor space, while caddies make transportation easy for frequently used items.
Here are some practical ideas for outdoor storage:
– Use weatherproof boxes for larger equipment.
– Install wall-mounted racks for visibility.
– Keep outdoor tools in a caddy for easy transport.
– Ensure storage areas are organized and labeled.
Outdoor tool storage is vital for maintaining your tools’ longevity while keeping them handy for all your gardening and outdoor projects.
Outdoor Tool Storage Solutions
Editor’s Choice


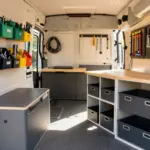
10. Create a Dedicated Tool Zone

Establishing a specific area for your tools can significantly enhance your organization and focus. A dedicated tool zone allows you to keep everything in one place, reducing clutter in other parts of your garage or workshop. This setup ensures that your tools are always easy to find.
When creating your tool zone, choose a location with good lighting and easy access. Utilize shelving units, pegboards, or toolboxes specifically for this area, and personalize it with colors or decor elements that inspire you.
Consider these tips for your tool zone:
– Select a well-lit, accessible location.
– Use dedicated shelving or pegboards.
– Personalize the area with colors and decor.
– Regularly maintain and declutter the zone.
A dedicated area for your tools guarantees that you’ll always know where to find them, making your projects more enjoyable and efficient.
Fun fact: 70% of garage clutter comes from tools scattered around. A dedicated tool zone can cut search time by up to 60%, turning chaos into calm and making tool box organization ideas feel effortless.
11. Implement a Maintenance Schedule

Staying organized involves more than just arranging your tools; it requires regular maintenance too. Establishing a maintenance schedule helps keep your tools in good condition while ensuring your workspace remains tidy. This proactive approach can save you time and frustration in the long run.
Consider setting a reminder for monthly tool checks to look for damage and wear. Organizing seasonal reviews can declutter and rearrange your tools as necessary, ensuring everything is in its right place.
Here are actionable steps for your maintenance routine:
– Set monthly reminders for cleaning and checking tools.
– Organize seasonal reviews for decluttering.
– Keep an inventory to track tools.
– Return tools to their designated spots after each use.
A maintenance routine not only keeps your tools in top shape but also ensures a well-organized space.
12. Seek Inspiration and Adapt

As you work on organizing your tools, seeking inspiration from others can spark fresh ideas. Many creative storage solutions are available that can help you develop your unique system. Explore online resources like blogs and Pinterest, or attend local workshops for hands-on guidance.
Adapt what you find to fit your personal style and the specific tools you use most frequently. Collaborating with friends or family can also lead to unique storage solutions that you may not have considered.
Here’s how to find and implement inspiring ideas:
– Follow DIY blogs and social media for new concepts.
– Attend workshops for practical ideas.
– Collaborate with others for unique solutions.
– Experiment until you find what works best for you.
Staying flexible and open to new ideas allows your tool organization to evolve with your needs, keeping everything functional and stylish.
Conclusion

Keeping your tools organized doesn’t have to be a daunting task. With these toolbox organization ideas, you can create a functional and inviting workspace that showcases your creativity. Embrace these strategies, customize them to fit your needs, and watch how efficiently you can work on your projects.
Whether you’re a casual DIYer or a dedicated craftsman, the right organization system can enhance your productivity and make your projects more enjoyable.
Note: We aim to provide accurate product links, but some may occasionally expire or become unavailable. If this happens, please search directly on Amazon for the product or a suitable alternative.
This post contains Amazon affiliate links, meaning we may earn a small commission if you purchase through our links, at no extra cost to you.
Frequently Asked Questions
What are the most effective toolbox organization ideas to keep tools easy to find?
Start with a quick tool inventory to know what you actually have.
Then group items by use: hand tools, power tools, fasteners, and accessories.
Use modular toolbox inserts and stackable organizers to create dedicated compartments for each category. Add a pegboard wall or a magnetic strip so the most-used tools are visible and reachable.
Label every bin or drawer, and color-code by category for instant identification. Finally, reserve a place near your work surface for the tools you reach for every day, and store less-used items on higher shelves or in a labeled bin. This approach blends toolbox organization ideas with practical tool storage solutions and efficient tool storage.
How can I optimize a small workspace with DIY tool storage solutions?
Running out of space? Optimize a small workspace with wall-mounted solutions. Install a pegboard with a grid of hooks for daily tools, plus a rail system for long-handled items. Add a magnetic strip for nails, screws, and drill bits. Use clear, labeled bins or shallow drawers to keep parts visible. Consider a compact rolling cart or a small tool chest that can slide under a workbench. If ceiling or overhead space is available, add ceiling-mounted racks for seldom-used items. This setup blends garage organization tips with tool storage solutions that maximize every inch.
What should a practical DIY tool organization plan include to stay organized long-term?
Start with a full inventory and space map. Then create zones: an everyday grab-and-go zone, a project-specific area, and a bulk storage region. Choose storage furniture that fits your space, like a modular tool chest, wall-mounted panels, and small parts organizers. Implement consistent labeling and, if possible, color code by category. Set a maintenance routine—monthly quick audits and a yearly reorganization—to keep things tidy. This plan covers DIY tool organization, tool management ideas, and efficient tool storage.
What are budget-friendly garage organization tips that actually work?
For budget-friendly results, repurpose common items before buying new hardware. Use cereal bins, shoe organizers, or dollar-store bins to sort fasteners and small parts. Attach a pegboard with inexpensive hooks and a magnetic strip for metal tools. Use PVC or wooden dowels for simple holders and a wall-mounted shoe organizer for gloves, tape measures, and other essentials. Label everything with masking tape and a marker for quick updates. A compact rolling cart plus a few labeled bins can transform your space without breaking the bank. These garage organization tips rely on solid tool storage solutions that save money and space.
How can I keep tool storage efficient and prevent clutter from returning?
Make a habit: after each project, return tools to their designated spots. Do a quick nightly wipe-down of dirty tools and the work area. Schedule a monthly audit to check for duplicates, missing items, or worn-out organizers. Keep the most-used items within easy reach and move rarely used items to higher shelves. Update your labels if needed and consider a simple digital or written inventory for quick checks. With these tool management ideas and garage organization tips, your space stays tidy and efficient.